Welcome, snack enthusiasts, to the crunchy world of homemade kale chips! If you’re tired of the same old potato chips and looking for a guilt-free alternative, you’re in for a treat.
In this guide, we’ll embark on a journey to create the crispiest, most flavor-packed kale chips you’ve ever tasted.
So, what’s the secret behind these delightful snacks? Well, it’s all about the kale! But don’t worry; making kale chips is much simpler than you might think.
Kale Chips Ingredients
Before we dive into the kale chip-making adventure, let’s gather our supplies. Here’s what you’ll need:
- Fresh Kale Leaves: The star of the show! Opt for the freshest kale you can find. It’s your ticket to crispy kale chips.
- Olive Oil: A drizzle of this liquid gold will give your chips that perfect crunch.
- Salt: Just a pinch to enhance the flavors. You can adjust this to your taste.
- Optional Flavorings: Get creative! Add nutritional yeast for a cheesy twist or a dash of garlic powder for some extra zing.
Kitchen Equipment
- Baking Sheet: To lay out your kale in a single layer for even baking.
- Parchment Paper: This will save you from sticky situations and make cleanup a breeze.
- Mixing Bowl: For tossing your kale with oil and seasonings.
- Tongs: To flip and handle the kale like a pro.
Now, you might be wondering, “Why all the fuss about fresh kale?” Well, fresh kale leaves are like the canvas of your masterpiece.
They provide the foundation for a chip that’s crunchy, flavorful, and downright addictive. So, don’t skimp on freshness – your taste buds will thank you later.
How to Make Kale Chips
Washing and Drying
- Rinse Thoroughly: Start by giving your kale leaves a good rinse under cool running water. This step helps remove any dirt or residue.
- Dry Excess Moisture: After washing, gently pat the kale leaves dry with a clean kitchen towel or use a salad spinner. The drier, the better!
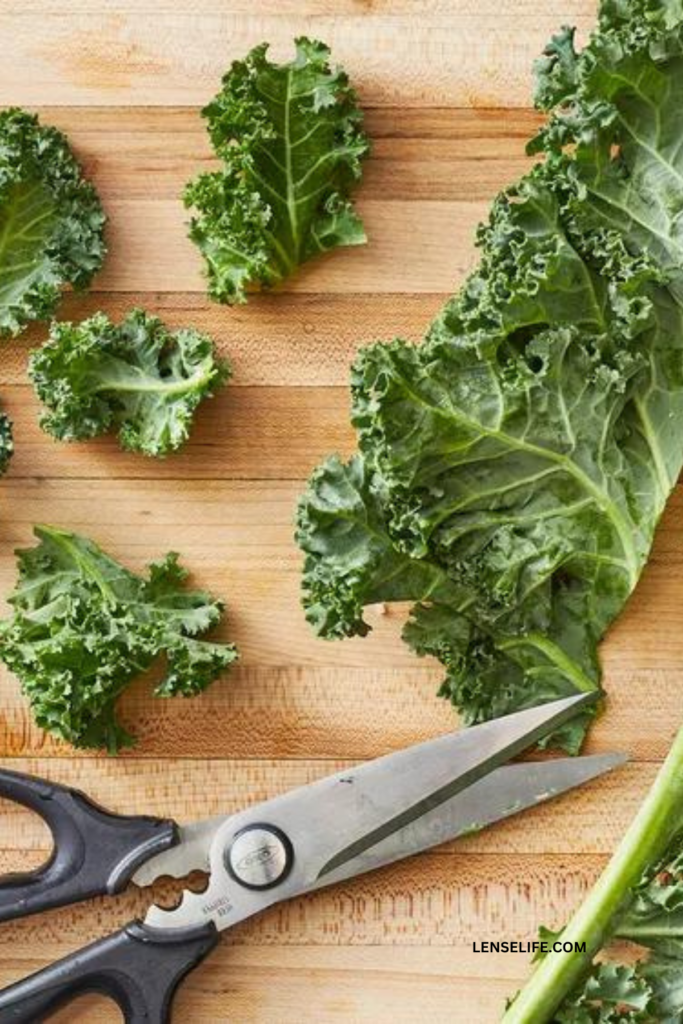
Removing Stems and Tear into Bite-Sized Pieces
- Remove Stems: Hold the stem end of a kale leaf with one hand and, with the other hand, run your fingers along the stem in the opposite direction to strip off the leaves. Discard the tough stems; we won’t be needing those.
- Tear into Pieces: Tear the kale leaves into bite-sized pieces. You don’t need to be too precise; rustic pieces add character to your chips.
Massaging with Olive Oil and Seasonings
- Place your kale leaves in a large mixing bowl.
- Drizzle your chosen oil (or use the basic olive oil) over the kale.
- Add your seasonings of choice – whether it’s a pinch of salt or one of the creative options mentioned earlier.
- Now, roll up your sleeves and give your kale a gentle massage. This step ensures that every leaf is coated with the flavorful goodness.
- If you want to keep your hands clean and evenly distribute the oil and seasonings, you can also use a Ziploc bag. Just toss everything inside, seal it up, and give it a good shake. Your kale will come out evenly coated and ready for the oven.
Importance of Even Coating
Achieving an even coating is key to uniform crispiness. Each kale leaf should carry a bit of that tasty seasoning to provide a burst of flavor in every bite.
Baking the Kale Chips
You’ve seasoned your kale to perfection, and now it’s time to turn these green beauties into crispy chips. Get ready to fill your kitchen with the irresistible aroma of baked kale!
- Preheat the Oven: First things first, preheat your oven to 350°F (175°C). It’s crucial to have a hot oven ready to give your kale chips that satisfying crunch.
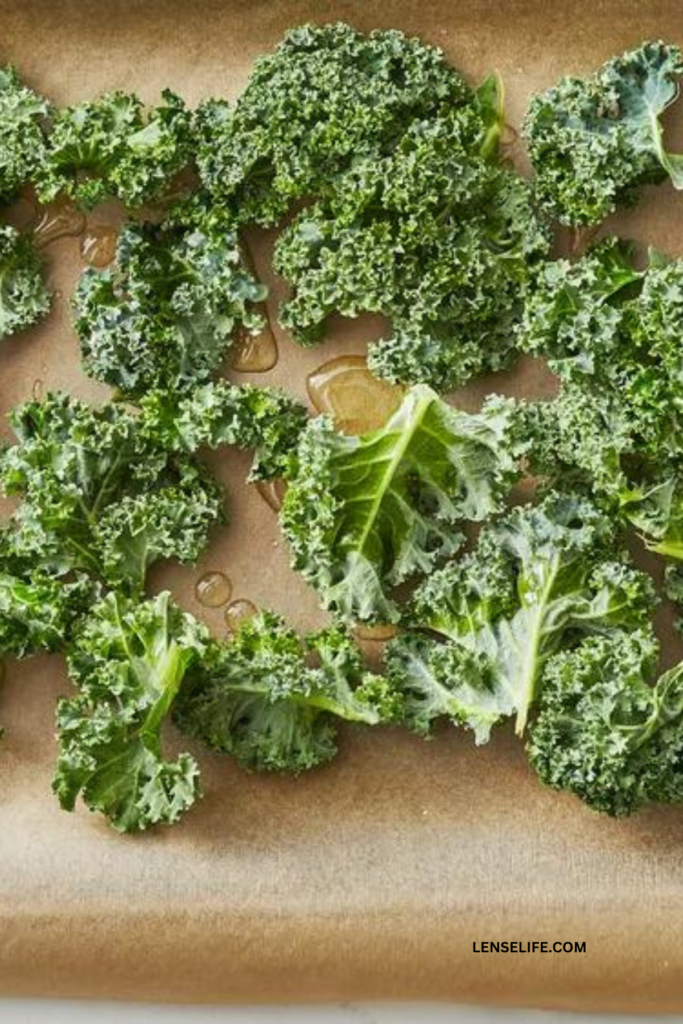
- Line the Baking Sheet: Grab your baking sheet and line it with parchment paper. This not only prevents sticking but also makes cleanup a breeze.
- Single Layer is the Key: Now, take those beautifully seasoned kale pieces and arrange them in a single layer on your prepared baking sheet. Make sure they have a bit of space to breathe; overcrowding can lead to uneven cooking.
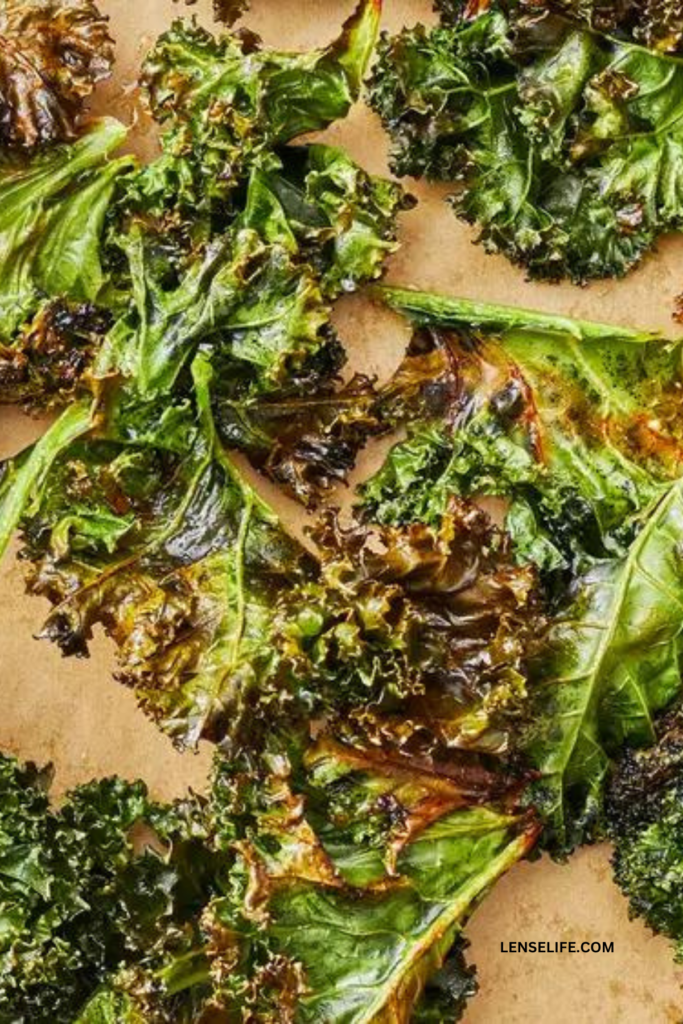
- Into the Oven: Slide your baking sheet into the preheated oven. Set your timer for 10-15 minutes. Keep an eye on them, as they can go from perfectly crispy to slightly burnt in a flash.
- Golden Perfection: Your kale chips are ready when the edges start turning a beautiful golden brown. Remember, they’ll continue to crisp up a bit after you take them out of the oven.
- Let Them Cool: After taking the kale chips out of the oven, resist the urge to dive in immediately. Allow them to cool right on the baking sheet. This will help them become even crispier.
Tips for Perfect Crispiness
Achieving that ideal crispiness requires a little finesse:
- Don’t rush the process. Low and slow baking is the key.
- Rotate the baking sheet halfway through for even cooking.
- If you’re making multiple batches, let the baking sheet cool down a bit between batches to avoid steaming the chips.
Troubleshooting
Common Problems and Solutions
Soggy Chips: If your kale chips turned out limp and lifeless, the culprit is often excess moisture. Make sure to dry your kale thoroughly before baking. Patience is key!
Unevenly Cooked Chips: To avoid patches of overcooked and undercooked chips, make sure to arrange them in a single layer with some space in between. Rotate your baking sheet halfway through the cooking time for even crispiness.
Pro Tips to Avoid Issues
Don’t Overcrowd: Overcrowding the baking sheet can lead to steaming instead of baking. Give your kale chips some breathing room.
Avoiding Overcooking: Here’s a kale chip secret: they can go from perfect to overcooked in the blink of an eye. So, stay vigilant and don’t wander too far from the kitchen. Your taste buds will thank you!
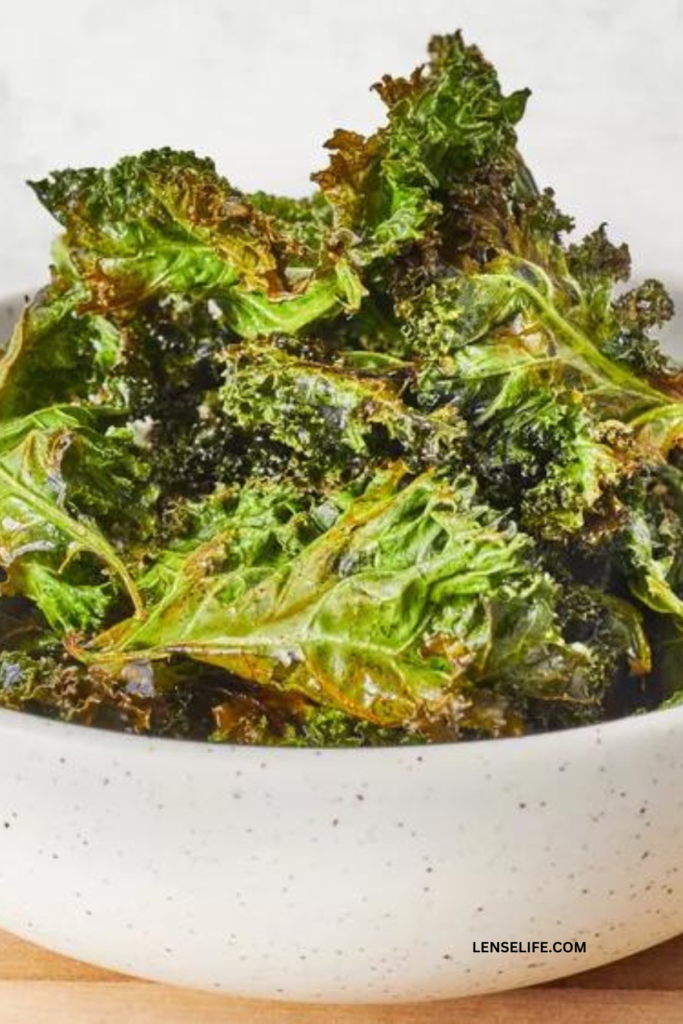
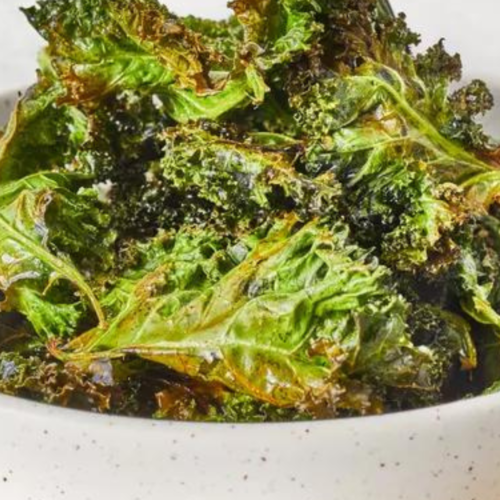
Serving in a Bowl: Pour them into a bowl and let everyone dig in. Perfect for snacking while watching your favorite shows.
Storing in an airtight Container: Store them in an airtight container to keep them fresh and crispy for days to come. They make fantastic on-the-go snacks or additions to lunchboxes.
With these troubleshooting tips in your arsenal, you’re well-prepared to conquer any kale chip challenges that come your way.
Choosing the Right Kale
Kale comes in various shapes, sizes, and flavors, and choosing the right one is crucial for a tasty outcome. Let’s explore your options:
Different Types of Kale
- Curly Kale: This is the classic choice. It has ruffled leaves and a slightly peppery flavor.
- Lacinato Kale (Dinosaur Kale): If you prefer a milder taste and flat leaves, go for Lacinato kale.
Selecting Fresh Kale
When you’re at the grocery store or farmer’s market, keep these tips in mind:
- Look for kale with vibrant, deeply colored leaves.
- Avoid wilted or yellowing leaves, as they may be past their prime.
- If possible, choose organic kale to minimize pesticide exposure.
Storing Kale
To keep your kale fresh until it’s chip-making time, follow these storage tips:
- Remove any rubber bands or ties from the bunch.
- Place kale in a plastic bag or wrap it in a damp paper towel.
- Store it in the vegetable crisper drawer of your refrigerator.
Nutritional Benefits
Before you devour your kale chips, let’s take a moment to appreciate the nutritional goodness you’re about to enjoy.
Fiber-Rich Snack: Kale chips are packed with fiber, which aids digestion and keeps you feeling satisfied. It’s the perfect guilt-free munchie.
Vitamins Galore: Kale is a powerhouse of vitamins, including A, C, and K. It’s also a great source of minerals like calcium and potassium. You’re basically snacking your way to good health!
Low-Calorie Delight: Compared to traditional potato chips, kale chips are a calorie-conscious choice. So, you can munch away without worrying about your waistline.
Flavor Combinations and Variations
Kale chips offer the flexibility of being prepared in a plain manner or enhanced with an array of seasonings. When it comes to dry seasonings, you have the freedom to incorporate your choice of seasonings before baking the kale chips.
As for liquid seasonings, I recommend lightly spritzing them on the chips after they’ve been baked, taking into consideration their delicate nature.
- For dry seasonings, you can choose from options such as sea salt, truffle salt, garlic powder, paprika, chili powder, parmesan, nutritional yeast (for a dairy-free cheesy flavor), onion powder, and ground mustard.
- For liquid seasonings, consider using vinegar, truffle oil, and tamari (or coconut aminos).
For More Healthy Snacks
- Spicy Deviled Eggs
- Best Nachos Recipe
- Smoked Salmon Cheese Ball
- Baked Plantain Chips
- Guacamole Bacon Burger Bites
Conclusion
Congratulations, you’ve now become a kale chip aficionado! You’ve learned the art of selecting the right kale, preparing it with care, and seasoning it to perfection. You’ve mastered the baking process and even tackled troubleshooting like a pro.
But most importantly, you’ve discovered a healthy and delicious snack option that satisfies your cravings without compromising on taste or nutrition.
Kale chips are the ultimate guilt-free pleasure, and they’re just waiting for you to get creative with your seasonings.
So, the next time you’re looking for a savory and satisfying snack, remember your trusty kale leaves and the endless flavor possibilities they offer.
Whether you keep it simple or let your taste buds roam wild, kale chips are here to stay, and they’re bound to become your new snacking obsession.
Now, it’s your turn to embark on this kale chip adventure. Grab your ingredients, preheat that oven, and let the crispy goodness begin. Happy snacking!
Frequently Asked Questions
Fresh kale is best for kale chips. Frozen kale tends to be too moist, which can result in soggy chips. Stick with fresh for that perfect crunch!
If you’re new to making kale chips, start with a simple seasoning of olive oil and salt. It’s a crowd-pleaser and a great introduction to the world of kale chips.
When stored in an airtight container at room temperature, kale chips can stay crispy and delicious for several days. But chances are, they’ll be gone before you know it!
Absolutely! You can use curly kale or Lacinato kale, depending on your preference. Both work beautifully for kale chips.
Yes, indeed! Kale chips are lower in calories and packed with nutrients compared to traditional potato chips. They’re a nutritious and guilt-free snack option.
If your chips are overly salty, you can balance the flavor by making another batch without salt and mixing them together. This will help tone down the saltiness.
How to Make Kale Chips (Healthy Snack Recipe)
Ingredients
- 4 kale, stalks
- 1 to 2 teaspoons extra virgin olive oil
- ¼ teaspoon kosher salt
Instructions
- Preheat your oven to 300°F (150°C). Thoroughly wash and dry the kale leaves. Tear the kale into bite-sized pieces and place them in a mixing bowl.
- In the mixing bowl, add the oil and salt, and gently massage the kale leaves until they are lightly coated with the oil.
- Arrange the kale pieces in a single layer on a baking sheet and bake for 8 minutes. After 8 minutes, rotate the baking sheet and continue baking for an additional 2 to 6 minutes. Be sure to check every minute or two to prevent burning.
- Once done, take the baking sheet out of the oven and let the kale chips cool for 3 to 5 minutes before enjoying.
