The Versatility and Nutritional Benefits of Eggs
Ah, eggs – those tiny powerhouses of goodness! They’re not just breakfast champions; they’re a nutritional bonanza too.
Packed with protein, vitamins, and minerals, eggs are nature’s gift to our taste buds and our bodies. And the best part? You can enjoy them in so many ways!
Whether you like them sunny-side-up, scrambled to perfection, or nestled in an omelet with all your favorite fixings, eggs are here to cater to your every craving.
And let’s not forget their starring roles in baked goods and desserts! Talk about versatility!
But hold on tight because we’re about to embark on an egg-citing adventure focused on one of the most beloved ways to enjoy eggs – boiling them to perfection!
The Importance of Boiling Eggs to Perfection
Now, you might wonder, “Why is boiling eggs perfectly such a big deal?” Well, my friend, the answer lies in that golden, yolky center.
Achieving the ideal consistency can turn an ordinary boiled egg into a delightful culinary experience.
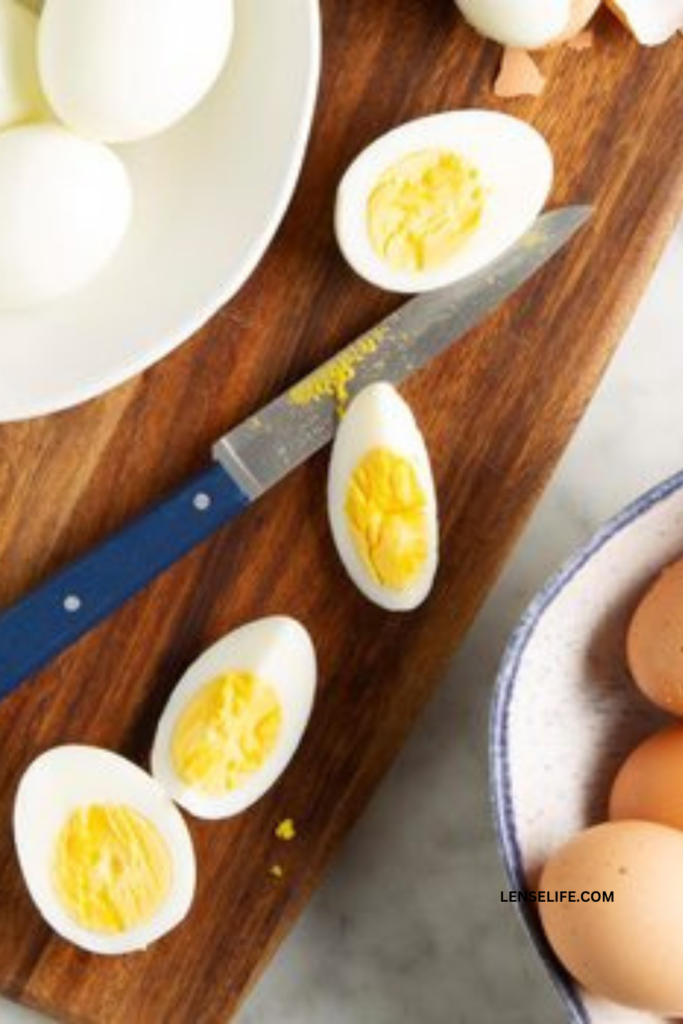
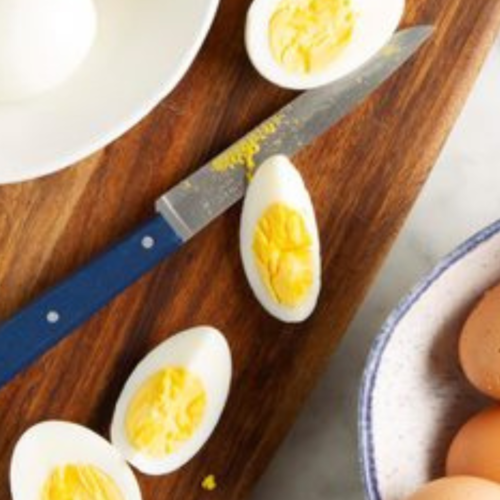
Imagine dipping your toast into a soft, jammy yolk that’s just waiting to burst with flavor. Or slicing into a hard-boiled egg with a perfectly light yolk and a firm, tender white. Mouth-watering, right?
Whether you’re crafting a quick and easy breakfast, a protein-packed snack, or adding boiled eggs to your favorite salads and dishes, nailing the perfect boil is the key to unlocking a world of egg-ceptional flavors and textures.
Common Flaws with the Traditional Cold-Water Approach
Now, I don’t mean to burst your egg-shaped bubble, but there’s a little flaw in the classic egg-boiling approach you’ve probably seen all over the internet – the cold-water method.
Sure, it’s easy enough – add eggs to a pot of cold water, bring it to a boil, and cook until they’re hard-boiled.
But here’s the thing: the type of pot you use can lead to subtle discrepancies in boiling times and heat retention. And that can spell disaster for your precious eggs.
Imagine your eggs chillin’ in a pot that takes longer to reach a boil. Those extra minutes might seem harmless, but they can lead to an unintentional egg overcook.
And that’s a no-no in the egg-citing world of perfectly boiled eggs!
Introducing the Hot Water Method as a Foolproof Alternative
Now, I’m about to let you in on a little egg secret – the hot water method! It’s the bee’s knees, the cat’s pajamas, the ultimate egg-boiling hack that’ll leave you with consistent, dreamy results every time.
Forget about pot materials and varying boiling times. With the hot water method, your eggs will be dancing in boiling water, regardless of the pot type.
Say goodbye to accidental overcooking and hello to egg-cellence!
But that’s not all – this method isn’t just for hard-boiled eggs. Whether you fancy soft, jammy yolks or medium-cooked delights, the hot water method has got you covered!
Understanding Egg Freshness and Quality
Explaining the Importance of Using Fresh Eggs
When it comes to boiling eggs to perfection, freshness is the name of the game! Fresh eggs not only taste better but also cook up beautifully.
As eggs age, the air pocket inside them grows, making them more challenging to peel and affecting their overall quality.
Imagine this: cracking open a fresh egg with its vibrant, perky yolk and robust white. That’s what egg-cellence looks like!
Using fresh eggs ensures you’ll get the best possible results and a delightful eating experience.
How to Test Egg Freshness
Now, I see you raising an eyebrow, wondering, “How do I know if my eggs are as fresh as a daisy?” Fret not; I’ve got a couple of egg-citing tests for you!
- The Float Test: Fill a bowl with cold water and gently place an egg inside. If it sinks to the bottom and lays flat, congratulations – it’s as fresh as can be!
If it stands on one end but still touches the bottom, it’s a bit older but still good to go. And if it floats like a buoy, it’s time to bid it adieu, as it’s not as fresh as we’d like.
- The Sound Test: Hold an egg close to your ear and give it a gentle shake. Fresh eggs will make little to no noise, while older ones might create a sloshing sound due to the larger air pocket inside.
By using these egg-squisite tests, you’ll be an egg freshness expert in no time!
Factors Affecting the Quality of Boiled Eggs
Now that we’ve mastered the art of selecting fresh eggs, it’s time to understand the factors that can affect the quality of our boiled beauties.
- Egg Size: The size of your eggs can influence the boiling time. Larger eggs might take a bit longer to cook through, while smaller ones might need less time. So, keep an eye on the clock and adjust accordingly.
- Pot Size: Believe it or not, the size of your pot matters too! Using a pot that’s too small might lead to overcrowding, causing the eggs to bump and crack during cooking.
Go for a pot with enough space to let those eggs do their boiling dance without interference.
- Altitude: Now, here’s a fun fact – your location matters when boiling eggs! At higher altitudes, the boiling point of water decreases, which can slightly alter the cooking time.
So, if you’re high up in the mountains, adjust your boiling time for egg-cellent results.
- Pot Material: While we’ve already embraced the hot water method to overcome pot material issues, it’s worth noting that using non-reactive pots like stainless steel or enamel-coated ones is generally a good idea.
Avoid pots made of reactive materials like aluminum, as they might affect the egg’s taste.
By keeping these factors in mind, you’ll be well on your way to egg-cellence in boiling eggs to perfection!
Are you ready to become an egg-boiling pro? Next up, we’ll explore the world of egg equipment and get you all set up for egg-citing adventures in the kitchen! Let’s get cracking on those delicious boiled eggs!
Choosing the Right Eggs
Selecting the Right Type of Eggs
As we embark on our egg-boiling journey, let’s talk about the eggs themselves.
These days, you’ll find an egg-stravagant array of options at the grocery store, from organic to free-range and everything in between.
But fear not, my fellow egg enthusiasts; I’m here to guide you through the egg-citing world of egg choices!
- Conventional Eggs: These are your standard eggs, and they’re widely available and budget-friendly.
They come from hens raised in cages, and while they’re perfectly fine for boiling, you might want to explore some egg-citing alternatives for added nutrition and ethical considerations.
- Organic Eggs: Organic eggs come from hens raised in accordance with strict organic farming practices.
They’re fed organic feed, roam outdoors, and aren’t treated with antibiotics or synthetic chemicals.
Choosing organic eggs is a great way to support sustainable agriculture and enjoy eggs with a clean conscience.
- Free-Range Eggs: Free-range eggs come from hens that have access to the outdoors, allowing them to roam and forage more freely.
These eggs might have a richer flavor and a more vibrant yolk color, making them an egg-cellent choice for boiling.
Ultimately, the choice between conventional, organic, or free-range eggs comes down to your preferences, values, and budget.
Whichever you choose, you’re sure to create egg-citing dishes that’ll make everyone’s taste buds dance!
Differentiating Between White and Brown Eggs
You’ve probably noticed that eggs come in two main colors – white and brown. But did you know that the color of the eggshell doesn’t affect the flavor or nutrition? It’s all about the breed of the hen!
- White Eggs: White eggs are laid by hens with white feathers and earlobes. They’re just as nutritious and delicious as their brown counterparts. So, if you prefer the classic white look, go for it!
- Brown Eggs: Brown eggs come from hens with red feathers and earlobes. They often conjure a sense of rustic charm and are popular in many households.
But remember, it’s all about personal preference – the taste and nutrition remain egg-cellent, regardless of the color.
Impact of Egg Size on Boiling Time
Now, let’s talk about size – egg size, that is! The size of your eggs can influence the boiling time, so it’s essential to keep that in mind when perfecting your boiled egg game.
- Large Eggs: Large eggs are the standard size you’ll find at most grocery stores. They’re versatile and work perfectly for most egg-boiling endeavors.
- Medium Eggs: Medium-sized eggs are a bit smaller, and boiling them might require a tad less time than their larger counterparts.
- Jumbo Eggs: On the other end of the spectrum, jumbo eggs are, well, jumbo! If you’re using these giants, you might need to add a little extra time to ensure they’re cooked to perfection.
By paying attention to the size of your eggs, you’ll master the art of timing and enjoy consistent, egg-cellent results every time!
Now that we’ve cracked the egg code on choosing the right eggs, it’s time to gear up with the essential egg-boiling equipment.
I’ll show you the ropes on selecting the perfect pot, getting the water just right, and starting your egg-boiling adventure on the right foot! Get ready for egg-citing times ahead!
Materials Needed
List of Essential Kitchen Tools
Before we dive into the egg-boiling extravaganza, let’s make sure we have all the right tools to rock this kitchen adventure!
Don’t worry; you won’t need fancy gadgets or gizmos. Just a few basic essentials, and you’ll be on your way to egg-cellence!
- A Saucepan or Pot: You’ll need a trusty saucepan or pot to boil those eggs to perfection.
Look for one that’s big enough to hold all your eggs comfortably, with enough space for them to dance around without bumping into each other.
- A Lid: Don’t forget a lid to cover your pot during boiling. The lid helps trap the heat, allowing the eggs to cook evenly and efficiently.
- Water: Of course, we can’t forget the most crucial ingredient – water! Fill your pot with enough cold water to cover the eggs by about an inch. That’s the secret sauce to a successful egg boil!
- A Skimmer or Slotted Spoon: This little tool comes in handy when gently placing the eggs into the boiling water. It prevents any egg-cidents and ensures smooth egg-boiling sailing.
- A Timer or Watch: Timing is everything in the egg-boiling game! Whether you prefer a classic kitchen timer or simply use your watch, having a way to keep track of time is egg-sential!
Now that you have all your egg-boiling tools ready, it’s time to move on to the pot-ential star of the show – the pot!
Selecting the Appropriate Pot and Lid
When it comes to choosing the perfect pot for boiling eggs, there are a few things to consider.
We’ve already embraced the hot water method to bypass the pot material issue, but let’s dive into some more pot-tastic details!
- Size Matters: Look for a pot that’s just the right size to hold all your eggs in a single layer. You don’t want them stacked on top of each other, as that can lead to uneven cooking.
- Material Magic: Non-reactive materials like stainless steel, enamel-coated, or non-stick pots are the way to go. They won’t interact with the eggs or alter their taste, ensuring egg-cellent results every time.
- The Lid Lock: Don’t forget the lid! A well-fitting lid helps maintain a consistent temperature inside the pot, allowing those eggs to cook to perfection.
Now that you’ve got the pot-entials all sorted out, it’s time to unleash your inner egg-boiling maestro! With the right tools at your fingertips, you’ll be boiling eggs like a pro in no time.
Next up, it’s time to fire up those stovetops and bring the water to a boil! I’ll walk you through the hot water method, step by step, so you can cook those eggs to your desired perfection.
Get ready for egg-citing times in the kitchen!
The Flawed Cold-Water Approach
Ah, the traditional cold-water approach – a popular method for boiling eggs, but let me tell you, it’s not all sunshine and rainbows.
While it may seem like a simple and straightforward process, there are a few egg-citing reasons why this method might not deliver egg-cellent results.
Impact of Pot Materials on Boiling Time and Heat Retention
Picture this: your eggs taking a relaxing dip in a pot of cold water, waiting for the heat to work its magic. Sounds cozy, right? Well, the type of pot you use can make a big difference in this egg-quation.
Different pot materials, like aluminum, stainless steel, or cast iron, have varying boiling rates and heat retention capabilities.
This means that if your eggs are simmering away in a cast iron pot, which takes a bit longer to reach a boil, you might accidentally overcook them.
And nobody wants a rubbery white or a green tinge around the yolk!
Consequences of Overcooking Eggs Due to Varying Pot Types
The cold-water approach can be a bit tricky because it doesn’t take into account the differences in pot materials.
So, if your pot is slow to reach a boil, your innocent eggs might be spending a few extra minutes in the hot water than necessary. And let’s face it, no one likes an overcooked egg!
The consequences of overcooking can vary depending on your egg-doneness preference.
For hard-boiled egg enthusiasts, it might not be the end of the world, but it can lead to an unappealing greenish tinge around the yolk. Not exactly the egg-cellent result we’re going for!
The Challenge of Achieving Precise Soft-Boiled Eggs with Cold Water
Now, if you’re a fan of soft-boiled eggs – those velvety, jammy yolks that are perfect for dipping toast soldiers – the cold-water approach can be a bit of a challenge.
Soft-boiled eggs require a precise cooking time, and using cold water doesn’t offer the same level of control as the hot water method.
With the hot water method, we’ll be in full control of the cooking process, ensuring that those soft-boiled eggs turn out egg-actly how we want them – with a yolk that’s runny and dreamy, ready to coat every nook and cranny of our toast!
Fear not, my egg-loving friends! The hot water method is here to save the day.
In the next section, I’ll reveal the egg-citing steps to achieve perfectly boiled eggs, regardless of your preferred egg-doneness level. Get ready for some boiling fun!
The Foolproof Hot Water Boiling Method
Get ready to become the ultimate egg-boiling maestro with the foolproof hot water method!
Say goodbye to overcooked eggs and hello to egg-cellent perfection. It’s time to unveil the egg-citing steps that will have you boiling eggs like a pro in no time!
Step 1: Preparing the Pot and Water
Choosing the Right Pot Regardless of Material: The beauty of the hot water method lies in its flexibility.
It doesn’t matter if your pot is stainless steel, enamel-coated, or non-stick – all pots are welcome to the egg-boiling party!
Just make sure it’s large enough to hold all your eggs in a single layer, giving them the space they need to cook evenly.
Ensuring Enough Water to Cover Eggs by an Inch: Fill your pot with enough cold water to cover the eggs by about an inch. This will allow the eggs to be fully submerged and cooked to perfection.
Step 2: Bringing Water to a Boil
Advantages of Boiling Water Before Adding Eggs: Here’s a game-changer – bring the water to a rolling boil before adding the eggs!
By boiling the water first, you ensure that all eggs enter the hot water together, regardless of the pot type. Say goodbye to those pot-related egg-cidents!
Water Temperature and Its Impact on Egg Cooking: Water temperature plays a crucial role in egg cooking.
Boiling water has a consistent temperature of 212°F (100°C), providing a controlled cooking environment for those eggs. This means they’ll cook evenly and to your desired doneness.
Step 3: Placing Eggs in the Boiling Water
Using a Skimmer to Avoid Cracking: Gently place the eggs into the boiling water using a skimmer or slotted spoon. This prevents any rough handling that could lead to cracked eggs.
Importance of Low Heat During Egg Placement: Reduce the heat to low before placing the eggs to avoid any bouncing or cracking.
Low heat keeps the water calm and ensures your eggs stay intact throughout the cooking process.
Step 4: Timing the Boiling Process
Recommended Cooking Times for Different Egg Consistencies:
6 minutes: Liquidy yolk and soft white – perfect for eggs served in an egg cup!
6 1/2 minutes: Soft, jammy yolk – ideal for eggs on toast or salads.
8 minutes: Slightly soft, yet firm medium yolk – a versatile choice.
10 minutes: The early stages of a hard-boiled egg with a smidge of softness.
12 minutes: Hard-boiled egg with a lighter yolk – classic and tasty.
14 minutes: Traditional hard-boiled egg – firm white and a light yolk.

Achieving Liquidy, Soft, Medium, and Hard-Boiled Eggs: The hot water method gives you complete control over your egg’s consistency.
Set a timer according to your preferred yolk texture, and you’ll achieve perfectly boiled eggs, each with its own delightful character.
Congratulations, you’ve just unlocked the hot water method to boil eggs perfectly!
Whether you’re craving liquidy yolks, jammy goodness, or classic hard-boiled delights, the hot water method has you covered.
In the next section, I’ll spill the secrets to perfectly peeling boiled eggs and share some egg-citing recipes that’ll have you egg-static with joy!
So, let’s keep that boiling enthusiasm alive and dive right in!
Achieving Consistent Results
You’re well on your way to egg-cellent egg boiling, but let’s take it a step further! In this section, we’ll explore how to achieve consistent results every time, no matter your cooking conditions or egg preferences.
Factors Affecting Egg Boiling Time
- Altitude: If you’re cooking at a higher altitude, take note that the boiling point of water decreases.
This means your eggs might require slightly less cooking time than those at sea level. Adjust your timing accordingly for egg-cellent results.
- Egg Size: Remember, size matters when it comes to boiling eggs! Larger eggs might take a bit longer to cook through, while smaller ones might be ready a tad sooner.
Always consider the size of your eggs and adjust the cooking time accordingly.
- Pot Size: The size of your pot affects the cooking time too. If you’re boiling multiple eggs in a larger pot, they might cook a bit faster due to the increased space. On the flip side, a smaller pot might require a bit more time as the eggs are closer together.
Avoiding Overcooked and Undercooked Eggs
Let’s face it – nobody likes a disappointing boiled egg! To avoid ending up with overcooked or undercooked eggs, follow these egg-cellent tips:
- Use a Timer: Timing is crucial! Whether you prefer soft, jammy yolks or fully set hard-boiled eggs, use a timer to ensure you hit that sweet spot of perfection.
- Test One Egg First: If you’re trying a new cooking time, test one egg first before boiling the whole batch. This way, you can make adjustments without any regrets.
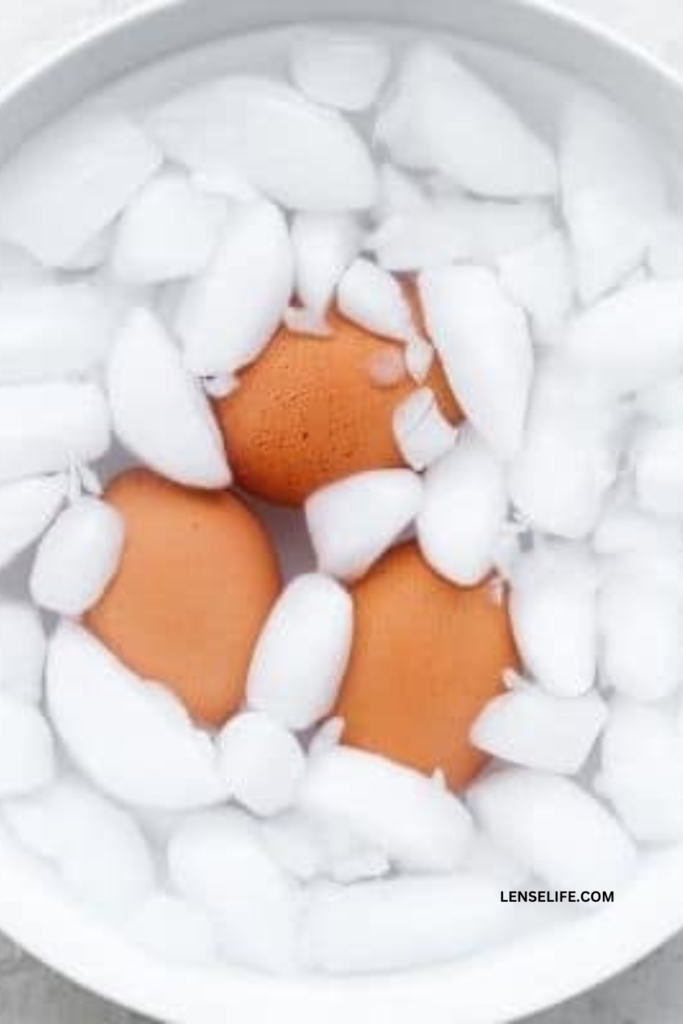
- Ice Bath Immediately: As soon as your eggs reach the desired cooking time, remove them from the boiling water and plunge them into an ice bath.
This halts the cooking process and prevents any further cooking or overcooking.
Tips for Cooking Multiple Eggs at Once
Cooking multiple eggs at once can be an egg-ceptional time-saver, especially for meal prep or feeding a hungry crowd! Follow these tips for egg-citing success:
- Evenly Spaced Eggs: Arrange your eggs in a single layer, ensuring they have enough space between them. This promotes even cooking and prevents any awkward egg collisions.
- Consistent Egg Size: For a consistent result, try to use eggs of the same size when boiling multiple eggs together. This way, they’ll cook at a similar pace, making your life a whole lot easier.
- Stir During Boiling: To ensure even cooking, give your eggs a gentle stir while they’re boiling. This will help distribute the heat and guarantee uniform results.
With these tips in your egg-boiling arsenal, you’re all set to achieve egg-cellent consistency every time you boil those eggs!
In the next section, I’ll reveal the art of perfectly peeling boiled eggs and share some egg-citing recipes that’ll have you coming back for seconds.
So, let’s crack on and discover the secrets to flawless egg peeling and scrumptious dishes!
The Art of Perfectly Peeling Boiled Eggs
Congratulations on mastering the art of boiling eggs! Now, let’s dive into the egg-citing world of perfectly peeling those boiled beauties.
Say goodbye to frustrating peeling experiences, and get ready to peel like a pro!
Step 1: Transferring Eggs to an Ice-Water Bath
Importance of Immediate Cooling to Stop Cooking Process: As soon as your eggs reach their desired cooking time, it’s time to stop the cooking process in its tracks.
How? By transferring them immediately to an ice-water bath. Plunging the eggs into icy water halts the cooking process and prevents any further cooking, preserving that perfect texture you worked so hard to achieve.
Preserving the Desired Texture Through Rapid Cooling: Rapid cooling with an ice-water bath locks in the texture you desire, whether it’s a liquidy yolk, a velvety soft-boiled center, or a classic hard-boiled egg.
No more guessing games; you’ll have precisely what you want!
Step 2: Peeling Boiled Eggs Effortlessly
Tapping the Thicker End for Easy Peeling: Here’s a game-changing peeling technique! To start the peeling process, gently tap the boiled egg on a hard surface, focusing on the thicker end.
This creates a small crack, making it easier to get under the membrane and peel the shell off.
Debunking Common Theories for Easier Peeling: You might have heard various theories claiming to make peeling easier, like using older eggs, adding baking soda or vinegar to the water, or praying to the egg-peeling gods.
But here’s the truth – the most effective way to get those shells off smoothly is by using the ice-water bath!
It helps create a slight contraction between the egg white and the inner membrane, making peeling a breeze.

Emphasizing the Effectiveness of an Ice-Water Bath: I can’t stress this enough – the ice-water bath is the hero of egg peeling!
It not only stops the cooking process but also makes those shells magically slide off, leaving you with beautiful, unblemished eggs.
With these egg-cellent peeling tips, you’ll be amazed at how effortlessly the shells come off, leaving you with gorgeous boiled eggs ready to be enjoyed.
In the next section, get ready to elevate your egg game with some egg-citing recipes that will showcase your newfound egg-boiling and peeling skills. So, let’s peel, cook, and savor the deliciousness!
Troubleshooting Common Issues
Even egg-sperts encounter challenges in the egg-boiling journey. But fear not, my egg-loving friends! In this section, we’ll tackle some common egg-cidents and show you how to overcome them like a pro.
Greenish Yolks: Causes and Prevention
Greenish yolks might make you scratch your head, wondering what went wrong. But worry not; it’s a common issue with an easy fix!
- Causes: The greenish tint appears when eggs are overcooked or exposed to high heat for an extended period. It’s a harmless chemical reaction between iron in the yolk and sulfur in the white.
- Prevention: To prevent greenish yolks, follow these tips:
Use the hot water boiling method to ensure precise cooking times.
Set a timer according to your desired yolk consistency and promptly remove the eggs from the hot water when done.
Transfer the eggs to an ice-water bath to stop the cooking process and prevent any further color change.
Preventing Cracked Eggs During Boiling
Cracked eggs can be egg-cruciating, but don’t worry – we’ve got you covered!
- Causes: Cracks can happen if the eggs are handled too roughly or if they collide with each other or the pot during boiling.
- Prevention: To avoid cracked eggs:
Gently place the eggs in the boiling water using a skimmer or slotted spoon to prevent any rough handling.
Ensure the heat is reduced to low before adding the eggs to avoid any vigorous bubbling that could cause collisions.
Use a pot that’s large enough to hold all the eggs in a single layer, giving them enough space to cook evenly.
Addressing Difficulties in Peeling Eggs
Struggling to peel those eggs? Fret not – we’ve got egg-squisite solutions!
- Causes: Peeling difficulties can occur if the eggs are too fresh or if they weren’t cooled down quickly enough.
- Solutions: To make peeling a breeze:
Use slightly older eggs (around 7 to 10 days old) for easier peeling.
Plunge the boiled eggs into an ice-water bath immediately after cooking to create a slight contraction between the egg white and the inner membrane, making peeling smoother.
With these troubleshooting tips in your egg-boiling toolkit, you’ll conquer any egg-cidents that come your way!
In the next section, we’ll reward your egg-cellent efforts with some mouthwatering egg recipes that will showcase the wonders of perfectly boiled and peeled eggs.
So, let’s get cooking and taste the egg-stravaganza!
Tips to Prevent Cracking and Ensure Success
You’re now an egg-boiling extraordinaire, but let’s take your skills to egg-straordinary heights!
In this final section, we’ll share some egg-citing tips to ensure a crack-free and egg-sceptional boiling experience every time.
Allowing Eggs to Reach Room Temperature
Bringing Eggs Out of the Fridge Before Boiling: Give your eggs a chance to warm up before their hot water adventure.
Take them out of the fridge and let them sit at room temperature for about 15 minutes. This small step can make a big difference in achieving egg-celent consistency during cooking.
Impact of Room Temperature on Cooking Consistency: When eggs are at room temperature, they cook more evenly and consistently.
This eliminates any temperature shock when they meet the hot water, reducing the risk of cracking and ensuring a smoother boiling process.
Reducing Heat and Gentle Egg Placement
Preventing Cracks with Low Heat During Egg Placement: When you’re ready to add the eggs to the boiling water, make sure the heat is reduced to low.
Gentle egg placement avoids any abrupt splashing or collisions, safeguarding those delicate eggshells.
Avoiding Overcrowding in the Pot for Even Cooking: Give each egg enough space to enjoy a comfortable and even cooking experience.
Overcrowding can lead to inconsistent cooking times and, you guessed it, potential cracks. So, let your eggs enjoy some breathing room in the pot!
Considering Different Egg Brands for Shell Thickness
Identifying Factors Affecting Eggshell Durability: Eggshell thickness can vary between different brands and even different batches.
Factors like the hen’s age, diet, and environmental conditions can all influence shell durability.
Exploring Alternative Brands for Better Results: If you’ve encountered some egg-pealing challenges with a particular brand, consider experimenting with different egg brands.
You might find one that offers a more ideal shell thickness for your egg-boiling endeavors.
With these tips to prevent cracking and ensure success, you’re now a true egg-boiling aficionado!
Get ready to impress with perfectly boiled and flawlessly peeled eggs in all your egg-squisite dishes.
From salads to sandwiches, from appetizers to main courses – your egg-celent creations await! So, let your egg-citement guide you, and happy egg boiling!
Proper Storage of Boiled Eggs
You’ve successfully boiled those eggs to egg-cellence, and now it’s time to dive into the world of proper storage.
In this section, we’ll ensure your boiled eggs stay fresh and ready to enjoy whenever you crave a delightful egg-sperience!
Shelf Life of Boiled Eggs in the Refrigerator
Storage Duration for Hard and Soft-Boiled Eggs: You might wonder, how long can I keep these boiled wonders in the fridge? Here’s the scoop:
Hard-Boiled Eggs: Once you’ve boiled those eggs to your desired level of doneness, they can be stored in the refrigerator for up to one week. That’s egg-citing news for meal prep and easy snacking!
Soft-Boiled Eggs: For those velvety soft-boiled delights, enjoy them within three days of boiling. It’s best to savor that jammy goodness while it’s fresh and at its best.
Maximizing Freshness and Longevity: To maximize freshness and extend the shelf life of boiled eggs, store them in an airtight container in the refrigerator.
The airtight seal helps prevent any odors from other foods in the fridge from seeping into the eggs, preserving their pristine taste.
In-Shell vs. Peeled Boiled Egg Storage
Comparing Storage Options for Convenience and Freshness: You have two egg-citing options for storage – in-shell or peeled boiled eggs.
Let’s weigh the pros and cons:
In-Shell Boiled Eggs: Keeping the eggs in their shell provides an additional layer of protection, preserving their freshness for a longer period.
Plus, they’re incredibly convenient to grab and snack on whenever you fancy an egg-squisite treat.
Peeled Boiled Eggs: Peeled boiled eggs offer immediate gratification – no need to deal with the shell when you’re hungry!
However, they might lose a bit of moisture and freshness faster than in-shell eggs. If you choose this option, it’s best to consume them within a day or two.
Best Practices for Storing Eggs in the Main Part of the Fridge: Remember, when it comes to storing boiled eggs, the main part of the fridge is your egg-scape!
Avoid storing them in the refrigerator door, as frequent temperature changes can affect their freshness.
Instead, place them on a shelf in the main compartment, where they’ll stay cool and happy until you’re ready to enjoy them.
With these tips for proper storage, you’re all set to maintain the freshness and egg-cellence of your boiled eggs.
Whether you opt for in-shell or peeled storage, you’re guaranteed egg-squisite delights whenever you need them.
So, let’s savor the deliciousness and make the most of our perfectly boiled eggs!
Conclusion
Congratulations, egg-sperts! You’ve embarked on an egg-citing journey to master the art of boiling eggs perfectly, and you’ve cracked the code to egg-sellence.
Let’s take a moment to recap your egg-cellent accomplishments and savor the egg-sperience!
Recap of the Hot Water Boiling Method Benefits
By adopting the hot water boiling method, you’ve unlocked a foolproof approach to boiling eggs. The benefits are egg-ceptional:
Consistent Results: Say goodbye to undercooked or overcooked eggs! The hot water method ensures precise cooking times for your preferred egg consistency.
Versatility: Whether you’re a fan of liquidy yolks, velvety soft centers, or classic hard-boiled delights, this method has got you covered.
Flexibility in Pot Choice: It doesn’t matter if your pot is stainless steel, enamel-coated, or non-stick – the hot water method welcomes all pots to the boiling party!
Encouraging Readers to Master the Art through Practice and Experimentation
As you embark on your egg-boiling and peeling endeavors, remember that practice makes egg-sellence!
Don’t be afraid to experiment with different cooking times, egg sizes, and pot types. Each egg-sperience will egg-quip you with invaluable knowledge and skills.
The egg-venture is yours to enjoy, so keep boiling, peeling, and tasting those egg-squisite delights!
So, my egg-loving friends, embrace the egg-squisite world of perfectly boiled eggs with the hot water method.
Whether you’re a novice egg-boiler or an experienced chef, the joy of cracking open a flawlessly boiled egg remains unparalleled.
So, let’s keep the egg-sperimentation alive, share your egg-citing creations with family and friends, and egg-splore the endless possibilities of this humble yet versatile ingredient.
Get cracking, and may your egg-sperience in the kitchen be filled with deliciousness and egg-scitement!
Additional Tips and Tricks
You’ve become a true egg enthusiast, and now it’s time to take your egg-sperience to the next level with some egg-citing advanced techniques and fun facts! Let’s dive into the egg-sploration and uncover more egg-squisite knowledge.
Advanced Techniques for Egg Enthusiasts
Egg Boiling for Baking: Boiled eggs can add moisture and richness to baked goods like bread, muffins, and cakes. Try incorporating finely chopped hard-boiled eggs into your next baking adventure for a delightful surprise!
Egg Pickling: Elevate your egg-sperience with pickled eggs. Hard-boiled eggs soaked in a tangy and spicy brine make for a delectable and colorful addition to salads or a unique snack.
Tamago Kake Gohan: Discover the Japanese delicacy of Tamago Kake Gohan – a simple yet egg-quisite dish where a raw egg is gently beaten into a bowl of hot rice. Add soy sauce or other toppings for a heavenly breakfast or comfort food.
Egg-citing Fun Facts and Trivia
Egg-cellent Nutrition: Eggs are packed with protein, vitamins, and minerals. They’re considered a complete protein source, containing all nine essential amino acids.
Egg Colors: Eggshells come in various colors, including white, brown, blue, and even green! The color is determined by the breed of the hen.
World Record Egg: The most-liked photo on Instagram is a simple picture of an egg, known as the “world record egg.” It surpassed over 55 million likes, proving the universal appeal of eggs!
Egg Balancing: On the day of the vernal and autumnal equinoxes, it’s said that you can balance an egg on its end due to the Earth’s gravitational pull. Give it a try – it’s egg-silarating!
With these advanced techniques and egg-citing facts, your love for eggs will reach new heights!
Whether you’re experimenting with pickling or trying out unique egg dishes from around the world, your egg-sperience in the kitchen will be nothing short of egg-sceptional.
So, keep exploring, egg-spanding your egg-squisite horizons, and sharing the joy of perfectly boiled eggs with family and friends.
Happy egg-boiling and egg-sploring the wonderful world of eggs!
Frequently Asked Questions
As you’ve delved into the egg-squisite world of boiling eggs to perfection, you might have encountered some egg-citing questions and concerns along the way.
Let’s address the most common queries and provide egg-splanations to ensure your egg-boiling journey remains smooth and delightful!
The hot water boiling method offers more consistent and precise results compared to the cold water approach. By bringing the water to a boil first, you can control the cooking time more accurately, resulting in eggs with your desired consistency every time. Plus, it doesn’t matter which type of pot you use, as the eggs only hit the water once it’s boiling, ensuring even cooking regardless of pot material.
Fresh eggs are essential for egg-squisite results! To test egg freshness, place an egg in a bowl of water. If it sinks to the bottom and lays flat on its side, it’s fresh and egg-cellent for boiling. If it stands on one end at the bottom, it’s still good but not as fresh, and if it floats, it’s best not to use it for boiling.
The ultimate secret to flawless egg peeling is the ice-water bath! As soon as your eggs reach the desired cooking time, transfer them to an ice-water bath to cool rapidly. This creates a slight contraction between the egg white and the inner membrane, making peeling an egg-citingly easy task.
To prevent cracked eggs, follow these egg-cellent tips:
Use low heat when gently placing eggs in the boiling water.
Avoid overcrowding the pot to give each egg enough space to cook evenly.
Consider switching to a different pot or adjusting the heat if you consistently encounter cracking issues.
Absolutely! Boiled eggs can be stored in the refrigerator for up to one week for hard-boiled eggs and up to three days for soft-boiled eggs. Store them in an airtight container to maximize freshness and prevent any unwanted odors from other foods in the fridge.
The possibilities are endless! You can enjoy boiled eggs in various dishes, such as classic deviled eggs, egg salad sandwiches, and as delightful additions to salads and rice bowls. Get creative and experiment with different combinations to discover your egg-squisite favorites!
If you have any more egg-citing questions or concerns, feel free to reach out!
Egg-speriment with confidence and enjoy the egg-sperience of perfectly boiled eggs in your culinary adventures.
Happy egg-boiling, and may your kitchen be filled with the joy of deliciously boiled eggs!
How to Boil Eggs Perfectly
Ingredients
- 1 to 6 large eggs
Instructions
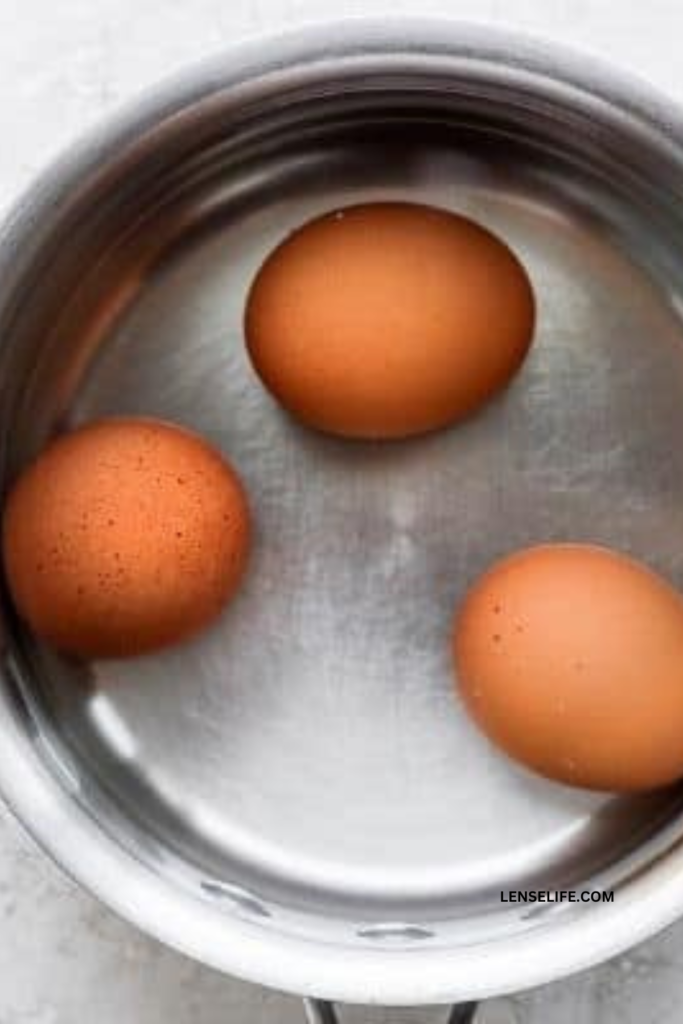
- Heat a medium-sized pot of water until it reaches a boiling point. Ensure that the water level in the pot is sufficient to cover the eggs by approximately one inch. While you're waiting for the water to start boiling, take the eggs out of the refrigerator and place them on the kitchen counter.
- Once the water has reached a boiling state, lower the heat to a gentle simmer where there are no longer any bubbles. Carefully use a skimmer to slowly place the eggs into the water. Afterward, increase the heat again until the water returns to a boiling state.
- Use a timer to keep track, and cook the eggs for either 6 to 7 minutes to achieve soft-boiled eggs, or 12 to 14 minutes for hard-boiled ones. Refer to the cooking time recommendations mentioned earlier. Meanwhile, while the eggs are cooking, get an ice-water bath ready.
- After the eggs have been cooked for your desired duration, employ the skimmer to take them out and promptly immerse them in the ice-water bath to halt the cooking process.
- Proceed to peel the eggs, beginning with the lower end initially as it's simpler to slide under the membrane.
